BakeMaster 1.0 Documentation
Welcome to the Documentation of BakeMaster - the Blender Baking Add-on to catch with and dive into your ultimate baking workflow that will be like never before - a pleasure!
Quickstart
About BakeMaster
Introduction
Welcome to BakeMaster, a powerful and fully-featured Blender baking add-on.
BakeMaster is an add-on specified for baking various texture maps and created for Blender - open-source 3D Computer graphics software. Along with its intuitive and convenient workflow baking process becomes a pleasure. Created from scratch for users who can’t stand wasting time, and yearn for most functionality and cutting-edge features.
We gave our best shot to make you love the setup in BakeMaster, which takes only 3 steps:
add meshes
add maps
set and hit Bake!
An unlimited number of objects and custom maps, each driven by unique settings - all can be configured and baked with BakeMaster!
Why Artists choose BakeMaster
Baking standard Cycles maps is straightforward, but what about baking dozens of them, or PBR-based that are highly relevant in physically accurate texturing? This can easily lead to losing valuable time. Having taken advantage of Blender’s node-based material system, we decided to create a fast, responsive, and comfortable baking solution alongside the native baking operator.
BakeMaster makes the whole process easy to tweak and delivers more functionalities.
Never worry about the nodes again: just toggle a couple of settings and BakeMaster will configure it all for you. Cycles maps are gone? Not just yet - simpler UI and manageable settings make it feel cool.
For whom is BakeMaster?
Baking is yours. BakeMaster is yours.
Whether you fall into baking rarely, or it is your regular workflow, BakeMaster will cover you. It is vital to have comfortable creation tools to save yourself time, and with which your artistic thoughts will never jump out of the boat.
Key Features
The main features that make BakeMaster rock:
Bake an unlimited number of objects and maps, each with unique settings
- 25 different map types available:
PBR-based maps
Default Cycles maps
Special masks
Bake adaptive Displacement with automatic modifiers
Real-time map preview in the viewport
Packing many items onto one map
Fully customizable map bakes
Denoise baked maps
Bake to UDIM tiles
Full control over Output settings
Internal & External Bake
UV Organization
Source to Target Bake
Keyword batch naming
Tips and Documentation
Vast Blender versions compatibility
Enhanced Bake Control
Responsive UI
Creation Process
BakeMaster is built on Blender Python API. It uses a native Blender baking operator for baking PBR-based maps, default Blender Cycles maps, and special mask maps. The add-on emits and advances Blender’s baking process, making it a top-notch solution for any scene setup.

History
First steps along
In August of 2021, the first idea about creating a baking add-on appeared. We wanted to improve standalone Blender’s baking workflow and adjust it to be comfortable, convenient and easy to use for any user on any level. It all started with a simple structure concept:
Mesh object as a ‘holder’ for the maps to be baked.
The concept was great, but the build was left on a dusty shelf and had not been touched for a long.
Active development
The active development of BakeMaster started around May 2022. At that moment, we were inspired to continue working and get the add-on finished. Having pulled up the old concepts, we were satisfied with the direction where to move next and, being fulfilled with new skills and knowledge, decided to take it seriously.
We improved the design structure and replanned it with new features and functionality added to Blender. From there, the BakeMaster felt its niche being lifted.
Present days
Even now, though BakeMaster Blender Add-on has been officially released, it is still under active development and improvement. The add-on latest release version is fully stable and ready to use. And our team is on its way to supporting BakeMaster with features and functionality users love and desire.
Tools and Sources
If you would like to know which tools or sources we used to create BakeMaster, feel free to contact the author.
License
As mentioned in the extract from www.blender.org/about/license:
Blender’s Python API is an integral part of the software, used to define the user interface or develop tools for example. The GNU GPL license therefore requires that such scripts (if published) are being shared under a GPL compatible license.
Therefore, BakeMaster is released under the GNU GPL Version 3 License. You receive it by downloading BakeMaster. BakeMaster Demo version license can be also received by cloning the GitHub repo.
By receiving the license with the download, you have the rights to:
Use the add-on for its purpose
Have access to the source code
Improve the program under the Contribute Documentation guidelines.
Except the BakeMaster documentation itself is available under the Creative Commons Attribution-ShareAlike 4.0 International License or any later version. The same applies to logos, icons, teaser images and all other images used along with the add-on. View the license.
Please attribute the BakeMaster Blender Add-on by kemplerart and include a URL link to the source of used content. For attribution details, view Creative Commons Best practices for attribution.
If you have any questions raised regarding the license or its presentation, feel free to contact the author.
Installation
Installation Guide
BakeMaster add-on works in Blender, so if you haven’t got it on your device just yet, go ahead! Make sure the Blender version you are using is compatible with BakeMaster.
![]()
Uninstall previous versions
If you have a previous version of BakeMaster running in Blender, installing a new one might cause runtime errors on registering, so follow the steps to uninstall it first:
Open Blender
Go to Edit > Preferences > Add-ons
Type “BakeMaster” into the search bar
Expand the add-on panel and click “Remove”
Save Blender Preferences
It would be good to restart Blender after for changes to take into effect.
Download the latest version
Download the latest BakeMaster add-on version from the Blender Market. We recommend installing the latest one, as we deliver stability and functionality improvements with each new version.
A demo version can be also installed from the GitHub repo:
Go to the install/ directory and download a zip folder.
See BakeMaster Versions for the difference between the Demo and the Full version.
After downloading a zipped add-on folder, do not unzip it.
Go to your Blender Preferences and install it. The add-on folder can be then accessed within Blender’s scripts/addons/ directory after.
Install BakeMaster into Blender
For the add-on to work, you need to install it into Blender:
Open Blender
Go to Edit > Preferences > Add-ons
Click “Install”
Specify the path to the download zipped add-on
Enable the addon
Access BakeMaster in Blender
BakeMaster add-on can be accessed in the 3D Viewport Workspace.
Hit the N key on your keyboard and you will see the add-on pop up on the right.
Head over to the add-on panel and you are good to go and start baking!
Update BakeMaster
Once a newer version of BakeMaster becomes available, uninstall all the previous versions. Download the newer one. Follow the steps in the sections above to install it into Blender. A new version will be announced in the Announcements
If you have issues with installing the add-on, feel free to reach out for help or contact the author directly.
BakeMaster compatibility
Which Blender versions?
BakeMaster is compatible with the following Blender versions:
Blender 2.83
Blender 2.90
Blender 2.91
Blender 2.92
Blender 2.93
Blender 3.0
Blender 3.1
Blender 3.2
Blender 3.3
If you face errors connected with Blender version compatibility, please submit your issue or contact the author.
Functionality differences
Newer Blender versions have more functionalities or improved ones, meaning some features of BakeMaster do also depend. The table below shows which Blender versions enable specific functionality or features listed in BakeMaster features.
Version of Blender |
BakeMaster Functionality included |
|---|---|
All compatible versions |
Unlimited number of objects and maps |
All compatible versions
|
All 25 map types,
including PBR-based, Default Cycles,
and special mask maps
|
All compatible versions
|
Adaptive displacement with
automatic modifiers
|
All compatible versions |
Real-time map preview |
All compatible versions |
Packing many items onto one map |
All compatible versions |
Fully customizable map bakes |
All compatible versions |
Denoise baked maps |
3.3, 3.2 |
Bake to UDIM tiles |
All compatible versions |
Full control over Output settings |
All compatible versions |
Internal & External Bake |
All compatible versions |
UV Organization |
All compatible versions |
Source to Target Bake |
All compatible versions |
Keyword batch naming |
All compatible versions |
Tips and Documentation |
All compatible versions |
Enhanced Bake Control |
All compatible versions |
Responsive UI |
Basic Usage
Navigate the table of contents below to grasp how to quickly set up and get the basic hang of BakeMaster. Each category has a hyperlink to a more detailed description.
Choose Objects
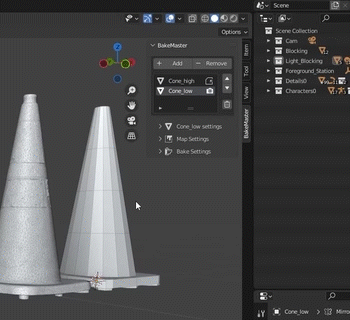
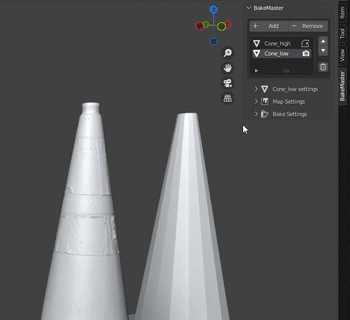
To start settings up maps for the objects you want to bake, you need to add these objects to the BakeMaster List of Objects table.
List of Objects table
When you first open up the BakeMaster panel in the 3D Viewport, it will appear as an empty table:
To add objects you would like to set up maps for:
Select these objects in the scene
Press the Add button to add them to the List
Note
You can add objects one-by-one or select all of them and add them at once.
Now, objects in the List of Objects can be configured with unique bake settings and an unlimited number of maps to be baked.
List of Objects table Controls
The List of Objects table has several important controls that can be viewed here.
Which objects can be added?
Only Mesh Objects
You can only add objects of type Mesh to the List of Objects. If you are trying to add the object of Non-Mesh type, it will not be added to the List of Objects, add a message will be displayed in the info bar:

If you have multiple objects selected and you are not sure that all of them are meshes, don’t worry: BakeMaster will add all the meshes and leave the ones that are not.
Objects holding the same Mesh instance
Multiple Objects holding the same Mesh instance cannot be added to the List of Objects. Meaning if you have two selected objects and both of them are linked to the same Mesh, only one of them will be added to the List of Objects.
The following message will appear in the info bar:

The same message will appear if you are trying to add the mesh object that already exists in the list.
Additional Tips
Bake Visibility
An object can be in the list but excluded from the bake. To do so, click the “📷 Camera” Button to toggle the object’s bake visibility.
Selecting objects
If you have a complex scene setup, it might be hard to find the object you have added to the List of Objects. But BakeMaster has a great feature here:
Tip
Click on the object in the list and it will be selected in your current scene.
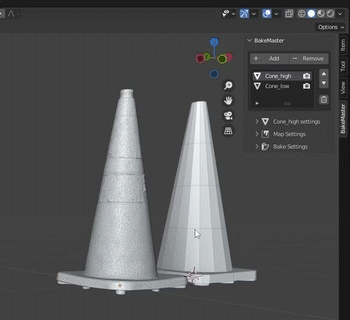
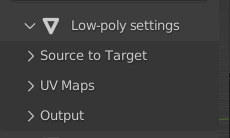
Source-target Settings
Bake shading on the surface of selected objects to the active object. The rays are cast from the low-poly object inwards towards the high-poly object. For more info regarding Source to Target bake, read Selected to Active Render Baking in the Blender Manual.
Choosing a source object
To choose a source object, it should be added to the List of Objects. Follow the steps:
Add both low and high-poly models to the List of Objects
Select the low-poly in the List
Expand the Item Settings panel
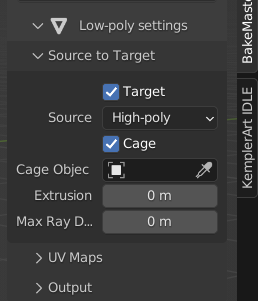
Expand the Source to Target panel
Check “Target”; set “Source” to be the high-poly.
Ray Casting Settings
Source-target Panel includes more settings, configuring which may improve baking results:
Extrusion
Max Ray Distance
Cage object
UV Settings
Item UV Settings are responsible to control an object’s UV Type, Active UV Layer, and whether to include the object in the UV Pack.
Access UV Settings:
Select the object in the List of Objects
Expand the Item Settings panel
Expand UV Maps panel
The following settings can be controlled (detailed information about UV Settings properties is on the UV Maps Panel Page):
UV Type
Active UV Layer
UV Packing and its settings
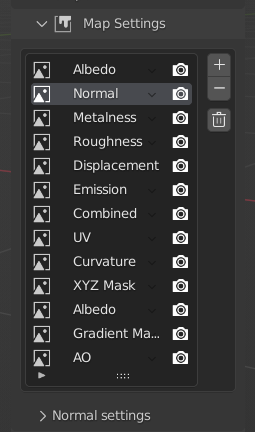
Choose Maps
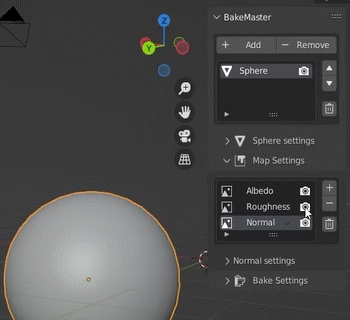
Each object in the List of Objects has a list of added maps. The Map Settings panel has preferences to set everything up.
List of Maps table
At first, the List of Maps will be empty. To add maps you would like to be baked, follow the steps below:
Select the object in the List of Objects
Expand Map Settings panel
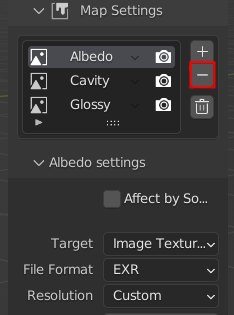
Click the “+” button to add a map pass

Each added map can be selected by clicking it and configured with unique settings.
List of Maps table Controls
The List of Maps table has several important controls that can be viewed here.
Additional Tips
About map types
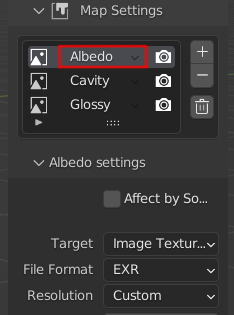
Map Pass type can be set by clicking the name of the map in the List of Maps table. You can choose a map pass type within the 25 types available.
Note
An object in the List of Objects can have an unlimited number of maps added.
Note
You can add map passes of the same map pass type. For example, you can bake three Albedo maps, each with unique settings.
Bake visibility
If you have prepared some maps for the future and you don’t want to bake them alongside others, click the “📷 Camera” button near the map pass to toggle its “bake visibility”. You can then get back to those maps and bake them too.
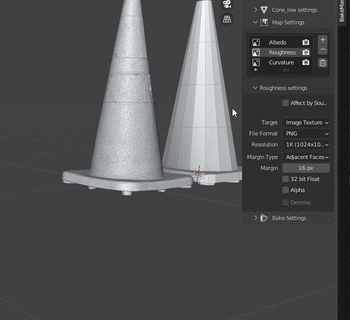
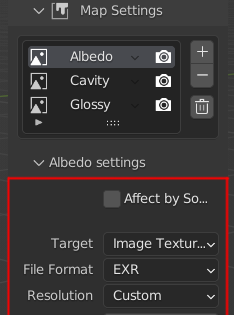
Map Settings
Each map is controlled by its unique map settings that can be accessed by following the steps below:
Select the object in the List of Objects
Expand Map Settings panel
Choose an active map pass
Expand the Map Pass Settings panel
The following settings can be controlled (detailed information about Map Settings properties is on the Map Settings Panel Page):
Map Pass Type
Map Output Settings
Special Map Settings
Bake Settings and Controls
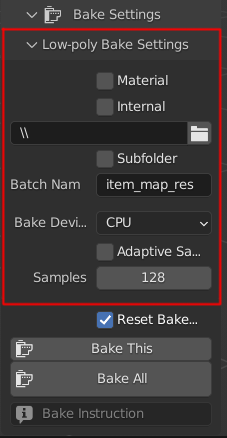
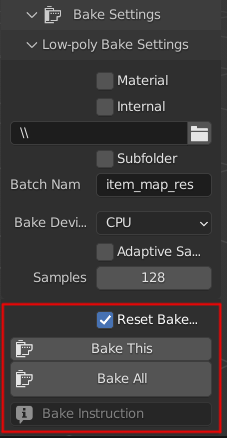
Item Bake Settings
The Bake Settings panel is responsible for setting up the baking device, samples, output directory and more. You can access them by:
Select the object in the List of Objects
Expand the Bake Settings panel
Expand Item Bake Settings panel
Each object in the List of Objects can have the following unique Bake Settings:
Material creation (create a material with all baked maps)
Internal/External output
Output directory and subfolder creation options for External save
Maps Batch naming (map naming keywords)
Bake device (CPU, GPU - depends on the system)
Adaptive sampling, sampling
Detailed information can be read on the Bake Settings Panel Page.
Bake Controls
Inside the Bake Settings panel, there are the following Bake Controls:
Reset BakeMaster option (reset BakeMaster after bake)
Bake This Button (bake maps only for the current item in the List)
Bake All Button (bake maps for all items)
Hint
There is also an embossed field called “Bake Instruction”. When you hover over it, you will see Baking process information and keyboard controls.
Baking Process
Starting the Bake
You can start the bake by pressing Bake All or Bake This Buttons. Baking progress will be shown in the bottom info bar of your Blender file:
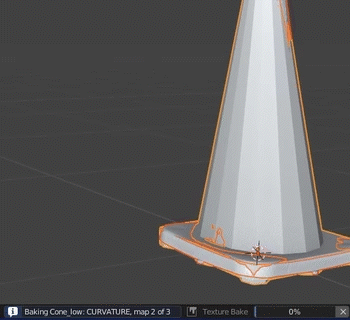
After a bake has finished, a message in the info bar will appear showing the amount of time the bake took.
Note
If there was any error with the object or map, the BakeMaster will skip baking them.
If there was any error connected with the bake itself, it will be canceled.
All errors will be shown in the info bar and printed to the Blender Console.
Controlling the bake
While Baking
The baking process can be controlled from your keyboard or Blender Console. All keybindings are presented below and under the Bake Instruction field inside the Bake Settings panel:
Press BACKSPACE to cancel baking all next maps
Press ESC to cancel baking current map
Press BACKSPACE + ESC to cancel baking
It is also recommended to have the Blender Console opened before baking (how to open it), so if there is a long unexpected freeze, you can easily abort the bake by pressing Ctrl + C or ⌘ Cmd + C (Mac) in the console window.
Below is the list of expected freezes that might occur:
Preparing multires data for Displacement bake (depends on subdivisions number)
Mesh UV-unwrapping (when UV Packing or unwrapping the mesh with no UV Layers)
Denoising a baked image.
Note
If the bake was canceled, the part of the job that has been done will be saved.
Undo the Bake Result
Just after the bake has finished or canceled, you can undo its result by pressing Ctrl + Z or ⌘ Cmd + Z (Mac) on your keyboard.
Help System
BakeMaster provides wide support for its users. It includes built-in User Interface Tooltips, Online web Documentation, and Community connection with support.
UI Tooltips
To view the tooltip of a UI layout element, hover the mouse cursor over it. The tooltip will appear in a second and usually for Operator or Property structure classes. If you don’t see a tooltip, enable Tooltips in the Blender Preferences.
Tooltip Elements
The UI structure class can contain the following tooltip elements:
- Name
Name of the control.
- Description
Short description of the control.
- Value
The current assigned value of the control.
- Python data path
When Python Tooltips are enabled in the Blender Preferences, a Python API access expression will be displayed.
UI Context Menu
When clicking with the right mouse click on the UI Property, the context menu appears:
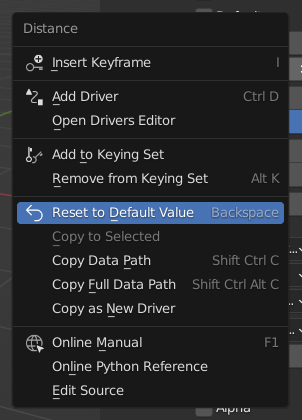
Below are some of the controls that the menu has:
- Reset to Default Value
Reset the property’s value to its default value.
- Copy Data Path | Copy Full Data Path
Copy the RNA path data path for the property to the clipboard
- Online Manual
View a context-based online manual in a web browser (link to a context-based section in the BakeMaster Documentation)
Web Links
You can find hyperlinks to related BakeMaster Documentation sections across Documentation website pages, README files, or other publicly available BakeMaster content. They provide a wide and expanded explanation with a description. Below are the most frequent and relevant website links for you to put an eye on:
- **README**
Basic Introduction to the BakeMaster Blender Add-on with a quick Basic Usage tutorial and other useful information for new users. You receive official README.md and README.html files with the downloaded zipped add-on folder.
- **Documentation**
Official and full BakeMaster documentation providing a complete overview of the add-on. You are reading it at the moment.
- **GitHub Repository**
GitHub repository that contains all media and content project files, and BakeMaster Demo Add-on version. You can view add-on version history, all releases and content. Community Discussions and Announcements are also available there.
User’s Workflow
User Interface
BakeMaster uses several Blender Window Areas for its workflow processes. Description of BakeMaster Panel areas like the List of Objects table or Bake Settings menu is described under in BakeMaster Panel page.
Areas
The Blender Windows is divided into areas. Read more about areas in the Blender Manual.
UI Panel
BakeMaster add-on Panel (aka the add-on’s UI organization unit) holds all the menus, properties, buttons, and controls for the user to manipulate.
The Panel can be accessed in the 3D Viewport Workspace.
Hit the N key on your keyboard and the right UI sidebar will pop up. Then navigate to the BakeMaster Tab, where you will see the add-on:
Editors
BakeMaster results and workflow is connected with several editing workspaces:
3D Viewport
UV Editor
Image Editor
3D Viewport
While baking, BakeMaster will configure the baking process by scripts. For bake to proceed properly, objects will be automatically selected, and materials with UV maps will be automatically configured. The add-on leaves Blender Interface unfrozen to see the baking progress and leaves the ability for the user to continue working in Blender while baking is active.
Below is the list of expected Interface freezes that might occur:
Preparing multires data for Displacement bake (depends on subdivisions number)
Mesh UV-unwrapping (when UV Packing or unwrapping the mesh with no UV Layers)
Denoising a baked image.
UV Editor
UV Unwrapping and packing, as well as UDIM tiles and properties, will be configured in the UV Editor. If there is no UV Editor available, BakeMaster will set the current active area to be one.
Image Editor
Before bake, BakeMaster creates image files to save the baked result. Baked image textures can be viewed in the Image Editor.
Status Bar
Baking progress, info messages, warnings, and errors will be displayed in the bottom status bar of your Blender file.

Note
While baking, the BakeMaster Status bar message updates every 2 seconds.
BakeMaster Panel
The BakeMaster Panel page describes UI properties and controls in each panel or section. All of them are divided into the following collection groups:
List of Objects table
The List of Objects table is a table that contains all added mesh objects. It has the following controls:
Bake visibility
Add Button
Remove Button
Baking Order Buttons
Trash Bin Button
Refresh Button
Bake Visibility
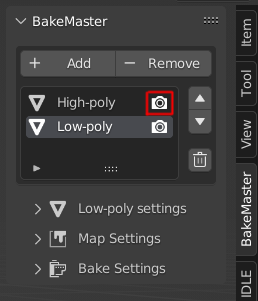
An object can be in the list but excluded from the bake. To do so, click the “📷 Camera” Button to toggle the object’s bake visibility.
Add Button
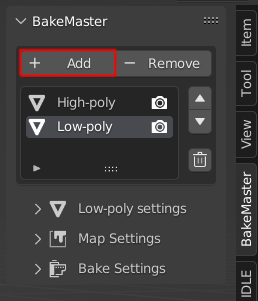
To add objects selected in the scene to the List of Objects, click the “Add” Button on top of the List of Objects table.
Remove Button
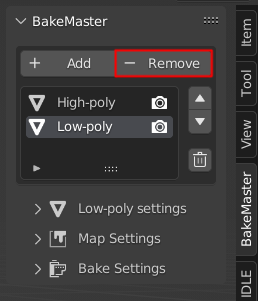
An object can be removed from the List of Objects by pressing the “Remove” Button. The active object in the list will be removed from the table.
Baking Order Buttons
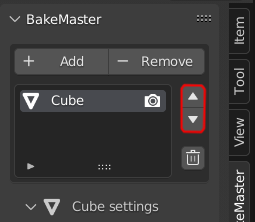
Objects added to the list will be baked from the top one to the bottom one. To change the baking order, select the object within the List of Objects and click Item Priority Buttons:
Trash Bin Button
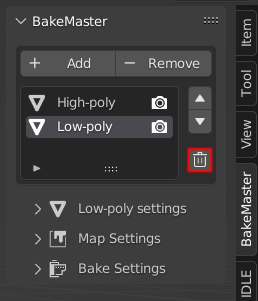
To remove all objects from the List of Objects table, press the “🗑️ Trash Bin” Button. All objects within the list will be removed and their setting will be reset.
Note
Trash Bin Button is equal to resetting BakeMaster. All preferences and settings will return to their default values.
Refresh Button
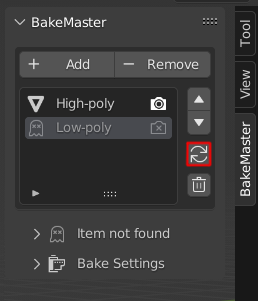
If an object was in the List of Objects, but you deleted it from your scene, it will appear greyed out. This is done to prevent you from losing all the settings that you have set for this object.
Press Ctrl + Z or ⌘ Cmd + Z (Mac) to return the deleted object along with its settings in the BakeMaster panel.
If you no longer want this object to appear in the table, press the “🔁 Refresh” Button to remove all greyed-out objects or remove them one-by-one by pressing the “Remove” Button.
Note
Refresh Button will only appear if any object within the List of Objects is not found in the scene (deleted).
Object Settings Panel
Each object has its prebake settings that are configured in the Object Settings Panel.
Source to Target Panel
Source to Target Panel has settings and preferences related to Source to Target bake. It contains the following controls:
- Use Target Check
Set to true if you want to set up the Source to Target setting for the current object in the List of Objects table.
- Source object
A dropdown list with available objects that can be set as a source for the current object in the List of Objects table. An object in the List of Objects is available as a source if it is not a source for another object already and it doesn’t use Source to Target settings.
- Extrusion
Inflate the active object by the specified distance for baking.
- Max Ray Distance
The maximum ray distance for matching points between the active and selected objects.
- Cage object
Object to use as cage instead of calculating the cage from the active object with cage extrusion. The cage object doesn’t need to be in the List of Objects.
Note
A Cage Object must be a mesh object and has the same number of polygons as a target object in the list.
A Cage Object is an inflated version of a target object.
UV Maps Panel
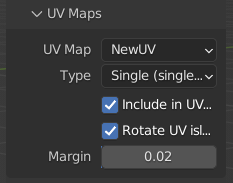
UV Settings are configured in the UV Maps Panel. There are the following properties:
UV Type
Active UV Layer
- UV Packing
Use UV Islands Rotate
UV Islands margin
UV Type is an option to set a correct UV Type for maps to be baked. You can choose between:
Single (Single tile - baking to a single image)
Tiles (UDIM tiles - baking to UDIMs)
More information about UV Maps and UDIM tiles can be found in the Blender Manual.
If an object has multiple UV Layers, and you want to specify a particular one to act as an active one while baking, choose the active layer in the Active UV Layer dropdown. The dropdown items are all available UV Layers of the Mesh Object in the list.
Note
If the object in the list has no UV Layers, the Active UV Layer will have the “Auto Unwrap” value and the object will be automatically unwrapped before the bake.
To bake multiple items onto one image texture, toggle the “Include in UV Pack”. Objects in the List of Objects with “Include in UV Pack” turned on will be packed before the bake.
Note
Choose Active UV Layer for the object to specify which UV Layer to use in the Pack.
Note
If the object has no UV Layers, it will be unwrapped automatically before the UV Packing.
UV Packing settings can be controlled after enabling Include in UV Pack:
Rotate UV islands for best fit
Packing margin (space between packed islands)
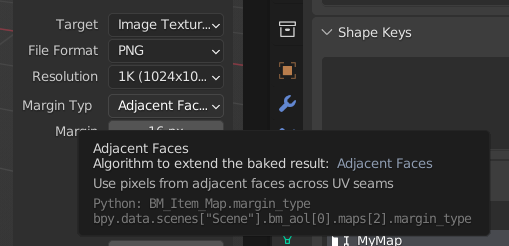
Output Panel
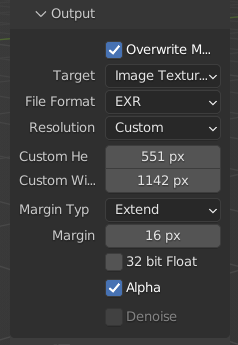
Currently, the Object’s Output Panel has Overwrite Maps Settings only.
Enable Overwrite Maps Settings for automatic maps output settings configuration. Controls:
- Target
Bake target in Image Textures or Vertex Colors. Currently, only Image Textures bake target is available.
- File Format
Output image File Format.
- Resolution
Output image Resolution
- Margin Type
Algorithm to extend the baked result.
- Use 32bit Float
Use 32bit Float image color depth.
- Use Alpha channel
Use the Alpha color channel in the output image.
- Denoise image after bake
Remove noise and despeckle output image after it has finished baking.
Map Settings Panel
List of Maps table
The List of Maps table has the following controls:
Bake visibility
Add Button
Remove Button
Trash Button
If you have prepared some maps for the future and you don’t want to bake them alongside others, click the “📷 Camera” button near the map pass to toggle its “bake visibility”. You can then get back to those maps and bake them too.
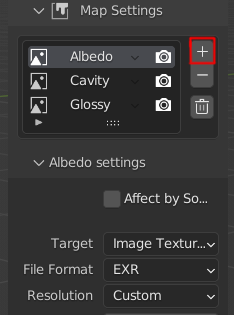
To add a new map pass to the List of Maps, click the “Add” Button on the right of the List of Maps table.
A map pass can be removed from the List of Maps by pressing the “Remove” Button. The active map pass in the list will be removed from the table.
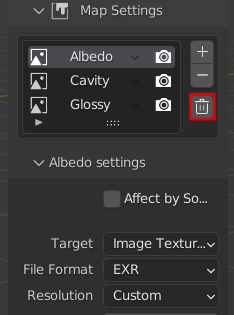
To remove all map passes from the List of Maps table, press the “🗑️ Trash Bin” Button. All maps within the list will be removed and their setting will be reset.
Particular Map Settings Panel
Each added map can have unique settings. They are divided into the following groups:
Map Pass Type
Map Output Settings
Special Map Settings
Map Pass Type is a type of the map to be baked. There are 3 categories:
PBR-based maps
Default Cycles maps
Special mask maps
There are 25 map types available in total. Each map pass type bake result is different, as well as its settings. You can read and view all the information about each map pass type and map passes in the Maps Workflow.
Map Pass Type can be set by clicking the name of the map in the List of Maps table.
Note
An object in the List of Objects can have an unlimited number of maps added.
Note
You can add map passes of the same map pass type. For example, you can bake three Albedo maps, each with unique settings.
Map Output Settings include:
File format
Resolution
Margin
Use 32bit float bit depth
Use Alpha Channel
Map Denoising
Affect by Source (apply Source to Target settings for this map pass)
Other settings that depend on the Blender version you are using
Detailed information about each map output setting can be viewed here.
Note
If you want all maps to have identical Output Settings, set up Overwrite Maps Output Settings.
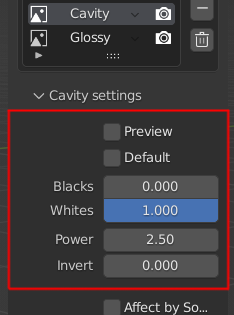
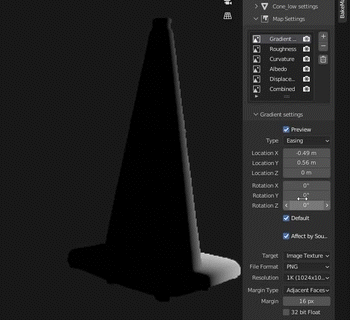
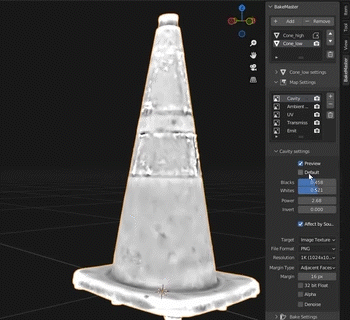
Some map passes like AO, Thickness, Displacement and others can have special settings. They can be also set inside the Map Pass Settings panel:
Use Default Special Settings
Special Settings
Real-time Map Preview
To toggle Special Settings customization, uncheck “Default” in the map settings panel. Below are all possible Special Settings available:
Quality-related |
|
Coverage-related |
|
Transform |
|
Color adjustment |
|
Other settings |
|
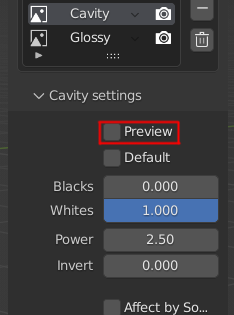
Special Maps have a toggle to preview the bake result using Blender Material Shader Nodes. The preview is only available with Cycles Render Engine enabled.
Note
Map Preview will add its custom nodes to preview the map. After toggling off the preview, all of those nodes will be removed without a single touch to the object’s initial materials.
Bake Settings Panel
Object Bake Settings Panel
Each object in the List of Objects can have the following unique Bake Settings that impact the duration of baking and its quality, as well as directory and files arrangement:
- Create Material
Automatic Material creation for the object with all baked maps.
- Internal/External output
Toggle to choose whether to save baked images to the disk or pack them into the Blender file.
- Output directory
- If saving externally, specify the output directory path.Set the Output directory path to be
//to save images to the Blender file location. - Subfolder creation
If saving externally, there is an option to create a subfolder in the specified output directory path.
- Subfolder name
If the subfolder creation option is enabled, you can specify the name of the subfolder.
- Maps Batch naming
Configure map naming pattern using the keywords.
- Bake device
CPU, GPU - depends on the system
- Sampling
- Output samples count.Adaptive sampling is supported too.
Bake Controls
Inside the Bake Settings panel, there are the following Bake Control Buttons:
- **Reset BakeMaster option**
Reset BakeMaster after the bake.
- **Bake This Button**
Bake maps only for the current item in the List.
- **Bake All Button**
Bake maps for all items.
- **Bake Instruction**
Baking process information and keyboard controls.
Hint
Full and detailed information regarding each control can be viewed by following its hyperlink.
Help Panel
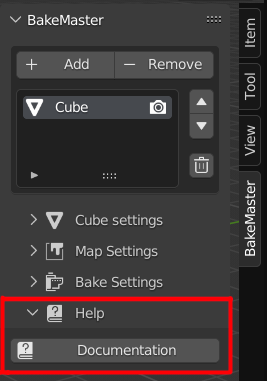
The Help Panel contains operators (buttons), by execution of which particular links get opened in your default web browser. Currently, there is only one operator that opens the main page of the documentation you are reading right now.
- Documentation
BakeMaster online documentation for help.
Object
Object page Table of Contents: Object properties references and short descriptions, and the Object definition itself.
Object
- class object
Note
This page contains all Object properties references and short descriptions, and the Object definition itself.
Each section has a code block with a script reference and another code block with a Blender Python Data Path to access the value in Python. __item_index__ is an index of a key in the List of Objects.
BakeMaster Object (Item can be also mentioned) is a BakeMaster List of Objects class unit. The Object is a Property Group that holds child properties and Map classes.
...
class BM_Item(PropertyGroup):
    ...
bpy.context.scene.bm_aol[__item_index__]
List of Objects
- class objects
List of Objects is a bpy_prop_collection_idprop collection class that contains keys. The key is the Object Property Group class.
...
bpy.types.Scene.bm_aol = bpy.props.CollectionProperty
...
bpy.context.scene.bm_aol
Object Pointer
- property object.object_pointer
Each Object class has a pointer to an existing mesh object data block in the Blender file scene. Object Pointer is assigned when this object is added to the List of Objects. Because Object Pointer stores a pointer to an object and not a full data block, its properties are changed along with the original object.
...
object_pointer : PointerProperty()
...
bpy.context.scene.bm_aol[__item_index__].object_pointer
Use Bake
- property object.use_bake
use_bake defines whether to include the Object in the bake. If False, then the Object is excluded and appears greyed out in the UI.
...
use_bake : bpy.props.BoolProperty
...
bpy.context.scene.bm_aol[__item_index__].use_bake
BakeMaster Scene Props
Blender file scene context props that are Object class related, but are top-level units.
Object Active Index
- property object.active_index
Active List of Objects key index is stored in this value. Not used in the UI.
...
active_index : bpy.props.IntProperty
...
bpy.context.scene.bm_props.active_index
Use UV Islands Rotation
- property object.use_islands_rotate
If True, rotate UV Islands when UV Packing for best fit.
...
use_islands_rotate : bpy.props.BoolProperty
...
bpy.context.scene.bm_props.use_islands_rotate
UV Pack Margin
- property object.uv_pack_margin
UV Pack margin for Islands UV Packing. Defines the packing distance between UV islands.
...
uv_pack_margin : bpy.props.FloatProperty
...
bpy.context.scene.bm_props.uv_pack_margin
Use BakeMaster Reset
- property object.use_bakemaster_reset
If True, empty the List of Objects and return all properties to their default values after the bake has completed.
...
use_bakemaster_reset : bpy.props.BoolProperty
...
bpy.context.scene.bm_props.use_bakemaster_reset
Bake Instruction
- property object.bake_instruction
Bake Instruction string Property that contains Baking Process control keyboard shortcuts.
Press
BACKSPACEto cancel baking all next mapsPress
ESCkey to cancel baking current mapPress
BACKSPACE + ESCto cancel baking
If you want to undo the bake, press Ctrl + Z or ⌘ Cmd + Z (Mac) just after it is finished or canceled.
Tip
Open Blender Console to, if you face an unexpected Blender freeze, press Ctrl + C or ⌘ Cmd + C (Mac) to abort the bake.
Warning
There are expectable Blender freezes when baking Displacement, Denoising baked result, baking item with no UV Map or UV Packing items that have no UV Maps
...
bake_instruction : bpy.props.StringProperty
...
bpy.context.scene.bm_props.bake_instruction
Bake Available
- property object.bake_available
True when no BakeMaster baking process is running, False when the bake is available. Not used in the UI.
Hint
If there was a Bake Error and you cannot run the next bake, because the Bake Controls are inactive, write the following expression to the Blender Python Console:
bpy.context.scene.bm_props.bake_available = True
...
bake_available : bpy.props.BoolProperty
...
Map
Map page Table of Contents: Map properties references and short descriptions, and the Object definition itself.
Map
- class map
Note
This page contains all Map properties references and short descriptions, and the Map definition itself.
Each section has a code block with a script reference and another code block with a Blender Python Data Path to access the value in Python. The map class can be accessed by the following expression, where __item_index__ is an index of a key in the List of Objects, __map_index__ is an index of a key in the List of Maps, :
map = bpy.context.scene.bm_aol[__item_index__].maps[__map_index__]
Further, the map will be mentioned as a reference to the initial Object’s Map class.
BakeMaster Map is a BakeMaster List of Maps class unit. The Map is a Property Group holding child properties that are accessed in the Bake Operator.
...
class BM_Item_Map(bpy.types.PropertyGroup):
    ...
map
List of Maps Active Index
- property object.maps_active_index
Active List of Maps key index is stored in this value. Not used in the UI.
...
maps_active_index : bpy.props.IntProperty
...
bpy.context.scene.bm_aol[__item_index__].maps_active_index
List of Maps
- class maps
List of Maps is a bpy_prop_collection_idprop collection class that contains keys. The key is the Map Property Group class.
...
maps : bpy.props.CollectionProperty
...
bpy.context.scene.bm_aol[__item_index__].maps
Use Bake
- property map.use_bake
use_bake defines whether to include the Map in the bake. If False, then the Map is excluded and appears greyed out in the UI.
...
use_bake : bpy.props.BoolProperty
...
map.use_bake
Map Type
Type of the Map Pass as a map bake type. There are 25 different map pass types available and listed in the table below:
PBR-based
|
Color image texture containing color without shadows and highlights |
|
Image texture for determining metal and non-metal parts of the object |
|
Image texture for determining roughness across the surface of the object |
|
Image texture for simulating high details without changing the
number of polygons
|
|
Height map used for displacing mesh polygons |
|
Image texture for determining transparent and opaque parts of the object |
|
Image texture for determining emissive parts of the object |
Special Masks
|
Ambient Occlusion map contains lightning data |
|
Image texture map to store small crevice details |
|
Image texture map to store object edge data |
|
Ambient Occlusion map that casts rays from the surface to the inside.
Often used for SSS or masking. Note that Thickness is scale-dependent,
meaning the map will be not visible for small-scale models
|
|
Contains data of rays that are casted from a particular axis |
|
Black and white gradient mask for masking |
Default Cycles
|
Bakes all materials, textures, and lighting contributions except specularity |
|
Ambient Occlusion map contains lightning data |
|
Bakes shadows and lighting |
|
Indicates object parts’ location in the UV space |
|
Bakes normals to an RGB image |
|
Mapped UV coordinates, used to represent where on a mesh a texture
gets mapped too
|
|
Bakes the roughness pass of a material |
|
Bakes Emission, or the Glow color of a material |
|
Bakes the environment (i.e. the world surface shader defined for the scene)
onto the selected object(s) as seen by rays cast from the world origin.
|
|
Bakes the diffuse pass of a material |
|
Bakes the glossiness pass of a material |
|
Bakes the transmission pass of a material |
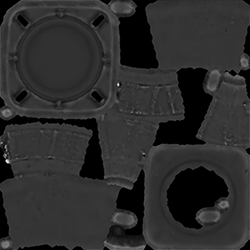
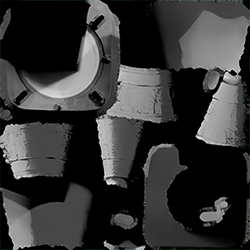
Baked Maps Examples
Below are presented baked maps of some map pass types:
AO |
Albedo |
|
|
Cavity |
Curvature |
|
|
Gradient |
Metalness |
|
|
Normal |
Position |
|
|
Shadow |
Thickness |
|
|
UV |
XYZMask |
|
|


Tip
As long as adding a new map pass created a completely new instance of a map class, you can have multiple map classes with the same settings, for example:
- property map.map_type
You can bake an unlimited number of Cavity maps for the Object.
...
map_type : bpy.props.EnumProperty
...
map.map_type
Bake
Bake page Table of Contents: Bake operators’ references and short descriptions.
Bake
- item_bake()
A BakeMaster Operator to bake image textures.
- Parameters
control (String) – The type of the baking operation
- Returns
Running status
- Return type
str
- Raises
KeyboardInterrupt – if the baking process is aborted by the user in the console
RuntimeError – if the bake runtime fails
Note
This page contains all Bake operators’ references and short descriptions.
Each section has a code block with a script reference and another code block with a Blender Python Data Path to access the operator in Python.
The main BakeMaster baking operator that iters through Objects (depending on the control value), iters through Object’s Maps and prepares arguments for the bpy.ops.object.bake or bpy.ops.object.bake_image, which is used to bake images textures.
bpy.ops.object.bake_imageis called for baking Displacement map pass typebpy.ops.object.bakeis called for baking all other map pass types.
...
class BM_OT_ITEM_Bake(bpy.types.Operator):
    ...
bpy.ops.bakemaster.item_bake()
Bake This
“Bake This” operation will bake image textures for the current active Object in the List of Objects.
...
class BM_OT_ITEM_Bake(bpy.types.Operator):
    ...
bpy.ops.bakemaster.item_bake(control='BAKE_THIS')
Bake All
“Bake All” operation will bake image textures for all Objects in the List of Objects.
...
class BM_OT_ITEM_Bake(bpy.types.Operator):
    ...
bpy.ops.bakemaster.item_bake(control='BAKE_ALL')
Error Handling
On this page, you will get the information about all BakeMaster errors, warnings, and messages that are printed to the Blender Console and to the Blender Status bar. In addition, we left a section with tips about what to do if BakeMaster raises an unexpected error.
Contents
BakeMaster Statuses - what BakeMaster reports to the Blender status bar
BakeMaster Console Prints - what BakeMaster prints to the Blender Console
Unexpected BakeMaster Errors - how to deal with unexpected script errors.
BakeMaster Statuses
As you flow with BakeMaster, you might see several status reports in the Blender Info bar. These statuses indicate the current stage of baking or a problem message that occurred. Statuses are divided into 2 groups: Workflow Statuses (reports sent while configuring BakeMaster) and Baking Statuses (reports sent while the baking process is active).
Workflow Statuses
Below are descriptions and report conditions of all handled workflow info status reports that are sent while configuring BakeMaster from the Panel.
Report id- how the reported status is labeledReport condition- condition to call the status reportMessage- message that will be reported
Report id |
Report condition |
Message |
INFO_ITEM_EXISTS |
On adding object to
the List of Objects,
that already exists
in the list.
|
Blender Status Bar:
Mesh exists in the list |
INFO_ITEM_NONMESH |
On adding object to
the List of Objects,
of a non-mesh type.
|
Blender Status Bar:
Expected mesh object |
INFO_MAP_PREVIEWNOTCYCLES |
On switching on the
map preview, when the
render engine is not
Cycles
|
Blender Status Bar:
Swith to Cycles Render Engine |
Baking Statuses
Below are descriptions and report conditions of all handled baking info status reports that are sent while the baking process is active.
Report id- how the reported status is labeledReport condition- condition to call the status reportMessage- message that will be reported
Report id |
Report condition |
Message |
FATALNOT_IN_CYCLES |
On the bake operator
execution, render engine
is not Cycles.
|
Blender Status Bar:
Swith to Cycles Render Engine |
FATALMAP_QUEUE_EMPTY |
On the bake operator
execution, no maps were
eligible to be baked.
|
Blender Status Bar:
No maps to bake |
FATALITEM_QUEUE_EMPTY |
On the bake operator
execution, no Objects
were eligible to be baked.
|
Blender Status Bar:
No items to bake |
FATALKEYBOARD_INTERRUPT |
On the baking process
active, the execution
was aborted by the user.
|
Blender Status Bar:
Bake Process Interrupted by user- execution aborted |
FATALBACKSPACE_EVENT |
On the baking process
active, the
BACKSPACEkey was hit and the baking
queue was emptied.
|
Blender Status Bar:
Cancelled all next bakes in thequeue |
MESSAGEENGINE_NONCYCLES |
On the baking process
active, the current render
engine didn’t support
baking.
|
Blender Status Bar:
Current render engine does not`` support baking``
|
MESSAGECAGE_OBJECT_INVALID |
On the baking process
active, the cage object
for the current object
was invalid.
|
Blender Status Bar:
Invalid cage object, the cage meshmust have the same number of facesas the active objectInvalid cage object, cage objectmust be a mesh |
MESSAGEERROR_MAP_PASSES |
On the baking process
active, there were no or
not enough passes to bake
the map.
|
Blender Status Bar:
No or not enough passes |
MESSAGEOJECT_INVALID |
On the baking process
active, the current object
was invalid.
|
Blender Status Bar:
Invalid item settings |
MESSAGEImageDenoiseRuntimeError |
On the baking process
active, while denoising
baked image, Runtime Error
was raised.
|
Blender Status Bar:
Denoising Fatal Error |
MESSAGEBAKE_ERROR |
On the baking process
active, while baking the
current map, unexpected
bake error occurred.
|
Blender Status Bar:
Unexpected bake error |
BAKING_PROGRESS |
On the baking process
active, the current
baking progress is.
reported every 2 seconds.
|
Blender Status Bar:
Baking [ObjectName]:[MapName], map [CurrentMapIndex]of [Length of Maps] |
BAKING_COMPLETED |
After the baking process
has completed, this
message is reported.
|
Blender Status Bar:
Bake completed in [Time] |
MESSAGECHANGED_MATERIALS |
On the baking process
active, when restoring
original materials, an
error occurred.
|
Blender Status Bar:
Changed materials |
Report Classes
The first row in the Report id field is the class of the report. The table below shows which operations these classes touch:
Class |
Description |
|
Fatal report usually stops the execution of the bake. |
|
Message report usually skips the operation it is referred to. |
|
Baking progress is an idle report which shows the baking progress. |
|
Baking complete is reported when the bake has been finished. |
INFO_... |
Information message is reported when something blocks a specific
process from the full execution.
|
BakeMaster Console Prints
Apart from the reports to the Blender Status bar, BakeMaster also prints messages to the Blender Console. BakeMaster can do printing only while baking. Below is the table showing all printed messages, their print conditions and descriptions:
Print id- how the print is labeledPrint condition- condition to printMessage- message that will be printed
Print id |
Print condition |
Message |
MESSAGESUBFOLDER_ERROR |
On the baking process
active, an error has been
raised while creating
a subfolder.
|
Blender Status Bar:
Subfolder creation error |
INFOCONTEXT_OVERRIDE |
On the baking process
active, when overriding
bpy.context foroperators’ execution.
|
Blender Status Bar:
Overriding Context |
MESSAGEBAKED_MATERIAL_ABORT |
On the baking process
active, when creating a
material with all baked
maps for the object,
there were no maps to
create the material from.
|
Blender Status Bar:
Aborting baked material creationfor [ObjectName]: no maps tocreate material from |
MESSAGEOPERATION_INVALID |
On the baking process
active, all the
MESSAGEreport classes statuses
are also printed.
|
Blender Status Bar:
[MESSAGE] |
STACK_OVERFLOW |
On the baking process
active,
blender.exeis catching a
STACK_OVERFLOW_EXCEPTION. |
Blender Status Bar:
catching STACK_OVERFLOW, resetBakeMaster and restart Blender |
MESSAGEImageDenoiseRuntimeError |
On the baking process
active, while denoising
baked image, Runtime Error
was raised.
|
Blender Status Bar:
Denoising Fatal Error |
FATALKEYBOARD_INTERRUPT |
On the baking process
active, the execution
was aborted by the user.
|
Blender Status Bar:
Bake Process Interrupted by user- execution aborted |
Attention
Report Classes are also applied to the Console prints.
Unexpected BakeMaster Errors
We make our best to test and establish the add-on’s stability, but there is little possibility to catch an unexpected error message. Those messages are highly likely to be connected with a source script error, and if you face one, we extremely encourage you to Report an Unexpected Issue. The tips below will help you before the error you have reported will have been fixed:
Tip №1
If you are using the BakeMaster add-on in the Blender version it is not meant to be compatible with, wait for the developers to upgrade BakeMaster to meet its requirements.
Tip №2
Try to identify which specific action you do causes the error. Avoid doing that action.
Tip №3
If Blender is crashing due to the error, it might be your system memory full or a script stack overflow error. In these cases, try copying the objects you want to proceed with the bake for into a new Blender file and repeat the bake.
Tip №4
If you have opened a Blender file (created in one Blender version) in the other Blender version, metadata leak and incompatibility might cause a BakeMaster crash error. Try running the bake in the Blender version the Blender file was created in.
Versions
BakeMaster Versions
Thinking you are already a friend of BakeMaster? Go ahead and download it - meet your baking mate! Not yet sure but driven up the wall why they couldn’t create something like BakeMaster before - try out the Demo Version.
Full Version
BakeMaster Full version is the BakeMaster Baking Add-on itself including all features and tweaks, fully packed, ready to bake whatever there is a need for. The Full version comes with all UI settings and controls, with the Bake Operator as the main BakeMaster execution logic. With the Full version of BakeMaster Blender Add-on, catch and dive into your ultimate baking workflow that will be like never before - a pleasure!
It’s time to download
BakeMaster can be downloaded from the Blender Market.
Lift our Spirits
If you are enjoying the product, how about supporting its further development?
Demo Version
BakeMaster Demo version includes the BakeMaster Blender Add-on without workflow logic. It is a trial version for users to get the feel of the add-on, its interface, controls stacks and layouts. The Demo version comes without the Bake Operator and Real-time Map Preview feature. It is an interface wrapper to meet BakeMaster.
The BakeMaster Demo version can be downloaded from the GitHub repo, Blender Market.
Attention
Before installing the Full version into Blender, make sure the Demo version is uninstalled. To uninstall the Demo version, follow the steps listed in the Uninstall previous versions section of the documentation.
BakeMaster Releases
All BakeMaster Releases and Changelogs are listed on this page. Each new release comes with newly added features, improvements or even fixes. For clarity, each section includes tags to identify the changes.
1.0 Release
The official, first release of BakeMaster Blender Add-on. View features.
Release
1.0 Base
Get Involved
Contribute Documentation
Needless to say that working as one community for the project’s perfectness is the most significant experience in its development. Furthering the idea, you are most welcome to edit, fix, and improve BakeMaster. Whether you like to solve a tiny spell mark or a major script bug, the sections below will guide you.
Useful Links
Submit a Review
Rate BakeMaster on Blender Market.
Submit an Issue
Submit an issue that you found in the BakeMaster add-on or the documentation.
Announcements Channel
BakeMaster news is announced in the BakeMaster Chat and the Announcements on GitHub.
Documentation
Documentation contributing guide:
Installing the Source Files
Installing Dependencies
To build the Documentation locally on your computer, you will need to have installed the following software:
Note
The installation process may be different on each operating system, the guides can be found online.
Installing Project Files
To install Documentation source files and BakeMaster Demo version scripts, clone the GitHub repo using the command:
$ git clone https://github.com/KirilStrezikozin/BakeMaster-Blender-Addon.git
List the current configured remote repository for your fork:
$ git remote -v
> origin ... (fetch)
> origin ... (push)
Specify a new remote upstream repository that will be synced with the fork:
$ git remote add upstream https://github.com/KirilStrezikozin/BakeMaster-Blender-Addon.git
Verify the new upstream repository you’ve specified for your fork:
$ git remote -v
> origin ... (fetch)
> origin ... (fetch)
> origin https://github.com/KirilStrezikozin/BakeMaster-Blender-Addon.git (push)
> origin https://github.com/KirilStrezikozin/BakeMaster-Blender-Addon.git (push)
Building the Documentation
The Documentation is written in .reStructuredText text files and built using Sphinx.
To install Sphinx, run the following command:
$ python -m pip install -U sphinx
Navigate to the project working directory, then to the
/docs/folderTo build the documentation, run the command:
$ make html
HTML pages will be in the /_build/ directory.
To view the built documentation locally in your Browser, open the
/_build/html/index.htmlin the Browser.
Editing the Documentation
Documentation working directory tree (inside /docs/ folder):
docs:.
├───contribute
│   ├───documentation
│   └───scripts
├───start
│   ├───about
│   ├───basic_usage
│   └───install
├───versions
├───workflow
│   ├───bake
│   ├───errors
│   ├───interface
│   │   └───panel
│   ├───map
│   └───object
├───_static
│   └───css
└───_templates
In the following folders are .rst text files for edititing:
contribute/
start/
versions/
workflow/bake/
workflow/errors/
workflow/interface/
workflow/interface/panel/
workflow/map/
workflow/object/
/.
_templates/ is for html override templates, and _static/css/ contains documentation theme (which is altered Read The Docs default theme).
.rst files are plain text files with the reStructuredText markup.
Style guide
We highly encourage you to obey established style guides for writing documentation. This page includes:
Writing Style Guide (writing rules)
Markup Style Guide (markup syntax)
Writing Style Guide
Rules to follow when writing documentation pages
Overall goals for writing documentation:
- User Relation
The documentation is created for users educated in CG, especially the Blender application and its workflow. The user should be familiar with texture baking, and what it stands for. But at the same time explicable for beginners and proficients, as far as baking can be complex in particular areas.
- Concise
Baking involves many aspects that can become hard and unnecessary to be documented. BakeMaster Documentation should include particular information and description regarding its functionality and features.
- Complete
Documented features should be provided with an understandable explanation covering the whole feature, its purpose range of usage and grouped under the appropriate topic.
- Polished
The described topic should follow the established documentation style.
Recommended:
Use American English
Check spelling and grammar
Make it simple, but fulfilled appropriately
Keep the sentence length between 4 and 12 words
If you don’t know what the feature you are documenting refers to, ask someone else before writing.
Paragraphs like Note that, Attention here, a warning should be placed in specific markdown admonition directories
Follow the existing documentation structure to know where to place a short description, and a full one.
Place enumerations or similar content in a list or table.
Avoid:
Long unseparated paragraphs (hard to read)
Writing in the first person
Vague language and weasel words
Long explanation if there is a simpler way to do it
Repeating information - better put a reference link
Markup Style Guide
The documentation is written in reStructuredText format files (.rst). This page is a quick tutorial about how to get around the reStructuredText markup syntax used in the BakeMaster docs.
==========
Page Title
==========

Section
=======

Subsection
----------

Subsubsection
*************

Another Section
===============

Subsection
----------
Note
Only one Page Title can exist on the page.
This is a simple paragraph. It describes some information
about an important feature. This is a simple paragraph.
It describes some information about an important feature.
This is a simple paragraph. It describes some information
about an important feature. This is a simple paragraph.
It describes some information about an important feature.

Another simple paragraph that is a little shorter. It
describes some further information about an important
feature.
Note
Use the syntax below to write a paragraph with one-line blocks:
| This is a simple paragraph.
| The lines will break exactly how there are here.
| This is a simple paragraph.
*italic text*
**bold text**
``literal``
- this is a bulleted list
- bullet list second item

1. this is a numbered list
2. this is a numbered list
3. this is a numbered list

* this is also a bulleted list
* this is also a bulleted list
    * that has some subelements
    * that has some subelements
       * that has some subelements
* this is also a bulleted list
Renders into:
this is a bulleted list
bullet list second item
this is a numbered list
this is a numbered list
this is a numbered list
this is also a bulleted list
- this is also a bulleted list
that has some subelements
- that has some subelements
that has some subelements
this is also a bulleted list
+------------------------------+-------------------------------------------+
| Column heading               | Column heading                            |
+------------------------------+-------------------------------------------+
| this is a simple table       | description                               |
+------------------------------+-------------------------+-----------------+
| it can have nested structure | like this - two columns | in one frame    |
+------------------------------+-------------------------+-----------------+
| bulleted list below          | | one-line blocks                         |
+------------------------------+ | can be written                          |
| - item 1                     | | with some *italic* text                 |
| - item 2                     |                                           |
| - item 3                     |                                           |
|                              |                                           |
+------------------------------+-------------------------------------------+
Renders into:
Column heading |
Column heading |
|
this is a simple table |
description |
|
it can have nested structure |
like this - two columns |
in one frame |
bulleted list below |
one-line blocks
can be written
with some italic text
|
|
|
||
...
use_bake : bpy.props.BoolProperty
...
Class code block like the one above can be written using a code-block:
.. code-block:: python
    :caption: properties.py
    :emphasize-lines: 2

    ...
    use_bake : bpy.props.BoolProperty
    ...
- property map.use_bake
- class map
The class and the property above can be written using the syntax below:
.. py:property:: map.use_bake
    :noindex:

.. py:class:: map
    :noindex:
Image with a caption under it:
.. figure:: /images/documentation/index_page/teaser_social_1200x600.png

    Image caption.
Image reference:
.. |image_ref_name| image:: /images/documentation/index_page/teaser_social_1200x600.png
    :alt: alternative text
    :width: 600 px
    :height: 300 px
    :class: float-right

|image_ref_name|

This paragraph is a simple paragraph about some paragraphical paragrof.
Hint
:class: float-right will make the image right-floated.
:file:`docs/_static/css/theme.css`
.. note::
    this is a short note.

.. attention::
    attention here, please.

.. warning::
    please keep in mind that...

.. DANGER::
    Oh no! **frightened**.

.. tip::
    Here is some tip.

.. hint::
    There is a hidden treasure.

.. admonition:: Custom Admonition title
    :class: seealso

    Custom admonition with a ``:class:`` as its class type and text.
Render into:
Note
this is a short note.
Attention
attention here, please.
Warning
please keep in mind that…
Danger
Oh no! frightened.
Tip
Here is some tip.
Hint
There is a hidden treasure.
Custom Admonition title
Custom admonition with a :class: as its class type and text.
External link:
`Link Title <https://link-to-the-webiste>`__
Reference within the page:
.. _my_reference:

Document section
----------------

Some important text goes there. Some important text goes there.
Some important text goes there.

...

To reference that section, use :ref:`my_reference`.
For a reference to another document:
:doc:`Title /path/to/file`
To learn more about reStructuredText, you can visit the following websites:
- Sphinx RST Primer
A brief introduction to reStructuredText (reST) concepts and syntax
- Tutorial on GitHub
reStructuredText (RST) Tutorial
Script Files
Follow the guide below to contribute to the BakeMaster script files:
Building the Add-on
To view the add-on in the Blender application:
Navigate to the add-on’s directory folder
Copy the folder
Paste the folder into your Blender’s
/addons/rootRestart Blender and enable the add-on in the Blender Preferences.
Tip
You can place your project working directory into the Blender’s /addons/ root right at the start to edit and see the changes faster.
Editing the Add-on
Add-on .py files are in the working directory and read by Blender. Below is the structure:
__init__.pyis used to register add-on classes and modules.ui_panel.pyconsists of genericbpy.types.Panelbuilt-in Blender Python API classes. Initializing panels.ui_panel_base.pycontains panels’ UI bases.utils.pycontains utility functions for operations.operators.pycontains BakeMaster configuration operators.operator_bake.pyfor the main baking logic - Bake Operator.labels.pyhas aBM_Labelsclass that contains strings used for properties’, operators’ and errors’ descriptions.
Make sure you updated the version key in the bl_info dictionary in the /__init__.py (increase the 3rd item in the tuple by 1):
17...
18bl_info = {
19    "name" : "BakeMaster",
20    "description" : "Bake various PBR-based or Cycles maps with ease and comfort",
21    "author" : "kemplerart",
22    "version" : (1, 0, 0), # (1, 0, 0) -> (1, 0, 1)
23    "blender" : (2, 83, 0),
24    "location" : "View3D > Sidebar > BakeMaster",
25    "warning" : "",
26    "wiki_url": "",
27    "tracker_url": "",
28    "category" : "Material"
29}
30...
Attention
Remember to follow the Style Conventions
Contribute
Pull Request on the BakeMaster GitHub page if you are contributing to the documentation or BakeMaster Demo version. Otherwise, contact the author and attach your project files as a zip folder to an email.
Contacts
- GitHub Page
- BakeMaster Demo version repository, as well as a place to submit issues, or have a devtalk.Project milestones are also sitting there.
- BakeMaster Chat
The Discord chat for discussions, announcements and more.
- kemplerart’s contacts
- email: kirilstrezikozin@gmail.comtelegram: https://t.me/kemplerart